

This series covers the end-to-end process of creating an instance on Google Cloud Platform (GCP) using Red Hat Ansible Automation Platform. This 3-part series includes:
Part 1: How to create an instance on GCP using Ansible CLI
Part 2: How to create a GCP instance using Ansible Automation
Part 3: How to create a GCP instance via workflow and Ansible
By the end of this article, you will have a clear understanding of how to use the Ansible Automation Platform CLI to automate the creation of GCP instances, which will save you time and reduce the risk of manual errors. Let's get started!
Prerequisites
- Ansible installed on your system.
- An active GCP Account with sufficient permissions.
- Ansible google cloud collection installed on your system.
We will start by setting up the necessary credentials and roles for our Ansible playbook to access the GCP API. Then we will create a disk, a network, a security group, and an IP address before finally launching the instance.
How to use Ansible CLI
- Create a service account in GCP.
- Generate the credentials for the service account.
- You should now have a credential.json file that you can use to access your GCP account and launch an instance.
- Open any editor and copy the following yml into it.
---

- name: Create instance in GCP

  hosts: localhost

  gather_facts: false

  vars:

    service_account_file: "<path to service account file>"

    project: "<SOMETHING>"

    network_name: "test-ansible-network"

    subnet_name: "test-ansible-subnet"

    ip_name: "test-ansible-ip"

    disk_name: "test-ansible-disk"

    machine_name: "test-ansible"

    region: "asia-south2"

    zone: "asia-south2-a"

    source_image: "projects/ubuntu-os-cloud/global/images/family/ubuntu-1804-lts"

    subnet_cidr: "10.0.1.0/24"

    disk_size: 10

    machine_type: "f1-micro"


  tasks:

    - name: Create a disk

      google.cloud.gcp_compute_disk:

        name: "{{ disk_name }}"

        size_gb: "{{ disk_size }}"

        source_image: "{{ source_image }}"

        zone: "{{ zone }}"

        project: "{{ project }}"

        auth_kind: serviceaccount

        service_account_file: "{{ service_account_file }}"

        state: present

      register: disk


    - name: Create a Network in GCP

      google.cloud.gcp_compute_network:

        auth_kind: serviceaccount

        project: "{{ project }}"

        service_account_file: "{{ service_account_file }}"

        name: "{{ network_name }}"

        auto_create_subnetworks: false

        state: present

      register: network


    - name: Create a Subnet in the Network

      google.cloud.gcp_compute_subnetwork:

        auth_kind: serviceaccount

        project: "{{ project }}"

        service_account_file: "{{ service_account_file }}"

        name: "{{ subnet_name }}"

        region: "{{ region }}"

        ip_cidr_range: "{{ subnet_cidr }}"

        network: "{{ network }}"

        state: present

      register: subnet


    - name: Reserve a static IP Address

      google.cloud.gcp_compute_address:

        auth_kind: serviceaccount

        project: "{{ project }}"

        service_account_file: "{{ service_account_file }}"

        name: "{{ ip_name }}"

        region: "{{ region }}"

        state: present

      register: address


    - name: Create an Instance

      google.cloud.gcp_compute_instance:

        auth_kind: serviceaccount

        project: "{{ project }}"

        service_account_file: "{{ service_account_file }}"

        state: present

        name: "{{ machine_name }}"

        machine_type: "{{ machine_type }}"

        zone: "{{ zone }}"

        disks:

          - auto_delete: true

            boot: true

            source: "{{ disk }}"

        network_interfaces:

          - network: "{{ network }}"

            subnetwork: "{{ subnet }}"

            access_configs:

              - name: External NAT

                type: ONE_TO_ONE_NAT

                nat_ip: "{{ address }}"
- Save and close the file.
- Then open the terminal in the directory where the file is located.
- Now run the following command:
ansible-playbook <filename>.yml
The output:
PLAY [Create instance in GCP] ************************************************************************************************************************************************************
TASK [Gathering Facts] ********************************************************************************************************************************************************************************************
ok: [localhost]
TASK [Create a disk] ************************************************************************************************************************************************************************************
changed: [localhost]
TASK [Create a Network in GCP] ***********************************************************************************************************************************************************************************
changed: [localhost]
TASK [Create a Subnet in the Network] ********************************************************************************************************************************************************************************************
changed: [localhost]
TASK [Reserve a static IP Address] *********************************************************************************************************************************************************************************
changed: [localhost]
TASK [Create an Instance] *******************************************************************************************************************************************
changed: [localhost]
PLAY RECAP ********************************************************************************************************************************************************************************************************
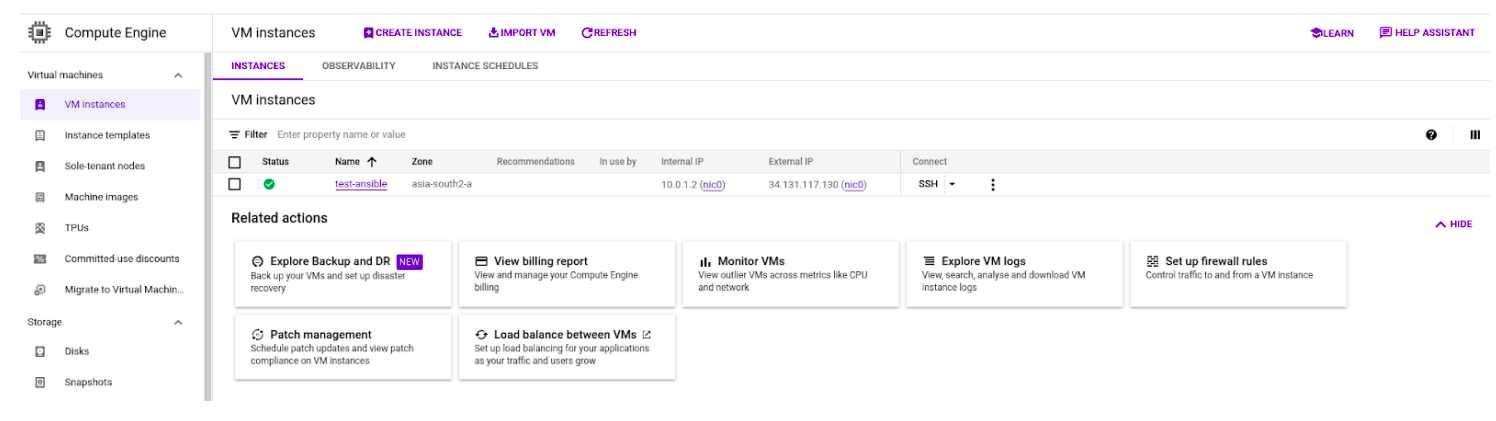
localhost : ok=6 changed=5 unreachable=0 failed=0 skipped=0 rescued=0 ignored=0
The GCP instance is shown in Figure 1.
By following the step-by-step guide, you should now have a good understanding of how to use Ansible to automate the creation of a virtual machine. To learn more about Ansible and access additional resources and guides, including diverse examples and use cases, we recommend visiting Red Hat Ansible Automation Platform.
What’s next?
In our next article, we will explore how Ansible Automation Platform further eases the process of creating virtual machines by enabling you to define infrastructure as code, track infrastructure changes, and enforce compliance policies. If you're interested in exploring how to use Ansible Automation Platform on Azure, you can also access the lab. This lab allows you to try Ansible Automation Platform on Azure and learn how it can be used to automate infrastructure deployment.
Get started with Ansible Automation Platform by exploring interactive hands-on labs. Download Ansible Automation Platform at no cost and begin your automation journey. You can refer to An IT executive's guide to automation e-book for a better understanding of the Ansible Automation Platform.
