How to manage microservices using OpenShift Dev Spaces and JKube
How to manage microservices using OpenShift Dev Spaces and JKube
In this exercise, we will deploy and update a distributed application on the fly using OpenShift Dev Spaces and Eclipse JKube. OpenShift Dev Spaces is a cloud development environment platform that allows developers to code, test, and deploy the applications using web-based IDE.
Introduction
Microservice architecture has become the go-to approach for building complex applications due to its ability to create and manage multiple independent components. However, developing, deploying, and updating these components can be challenging tasks. This is where Red Hat OpenShift Dev Spaces and Eclipse JKube come in to simplify the process.
In this exercise, we will deploy and update a distributed application on the fly using OpenShift Dev Spaces and Eclipse JKube. OpenShift Dev Spaces is a cloud development environment platform that allows developers to code, test, and deploy the applications using web-based IDE. Eclipse JKube, on the other hand, is a Kubernetes-based plugin that enables developers to build and deploy Java applications on Kubernetes and Red Hat OpenShift clusters.
Together, OpenShift Dev Spaces and Eclipse JKube provide a powerful flow for developing and deploying microservice applications. We will explore the step-by-step process of setting up a development environment, building a microservice application, and deploying it to the cluster. We will also look at how to easily update the application for development purposes.
By the end of this exercise, you will have a better understanding of how to develop, deploy, and manage microservices using OpenShift Dev Spaces and Eclipse JKube.
Prerequisites
Getting familiar with the application
The source code of the application we are going to use for this exercise is available on the GitHub repository. You can find a short description of this application and the microservices in the README.md.
Accessing OpenShift Dev Spaces
To access OpenShift Dev Spaces, go to the OpenShift workspace which will redirect to the user dashboard.
Starting a workspace
Follow these steps to start a workspace:
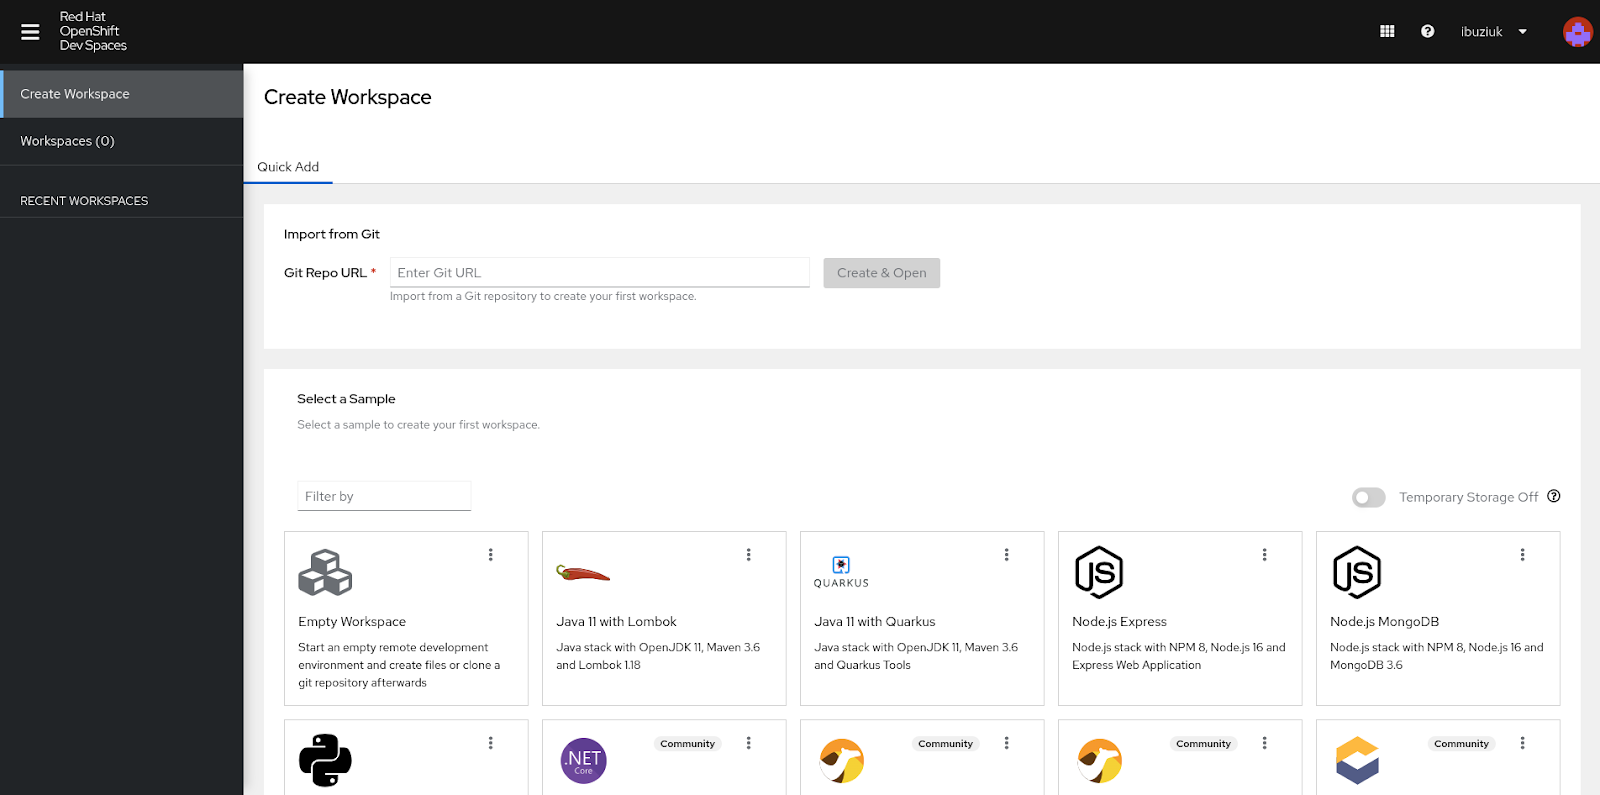
- Click on the Create Workspace tab on the user dashboard.
- Enter this URL to the repository: https://github.com/redhat-developer-demos/northwind-traders
- Click the Create & Open button.
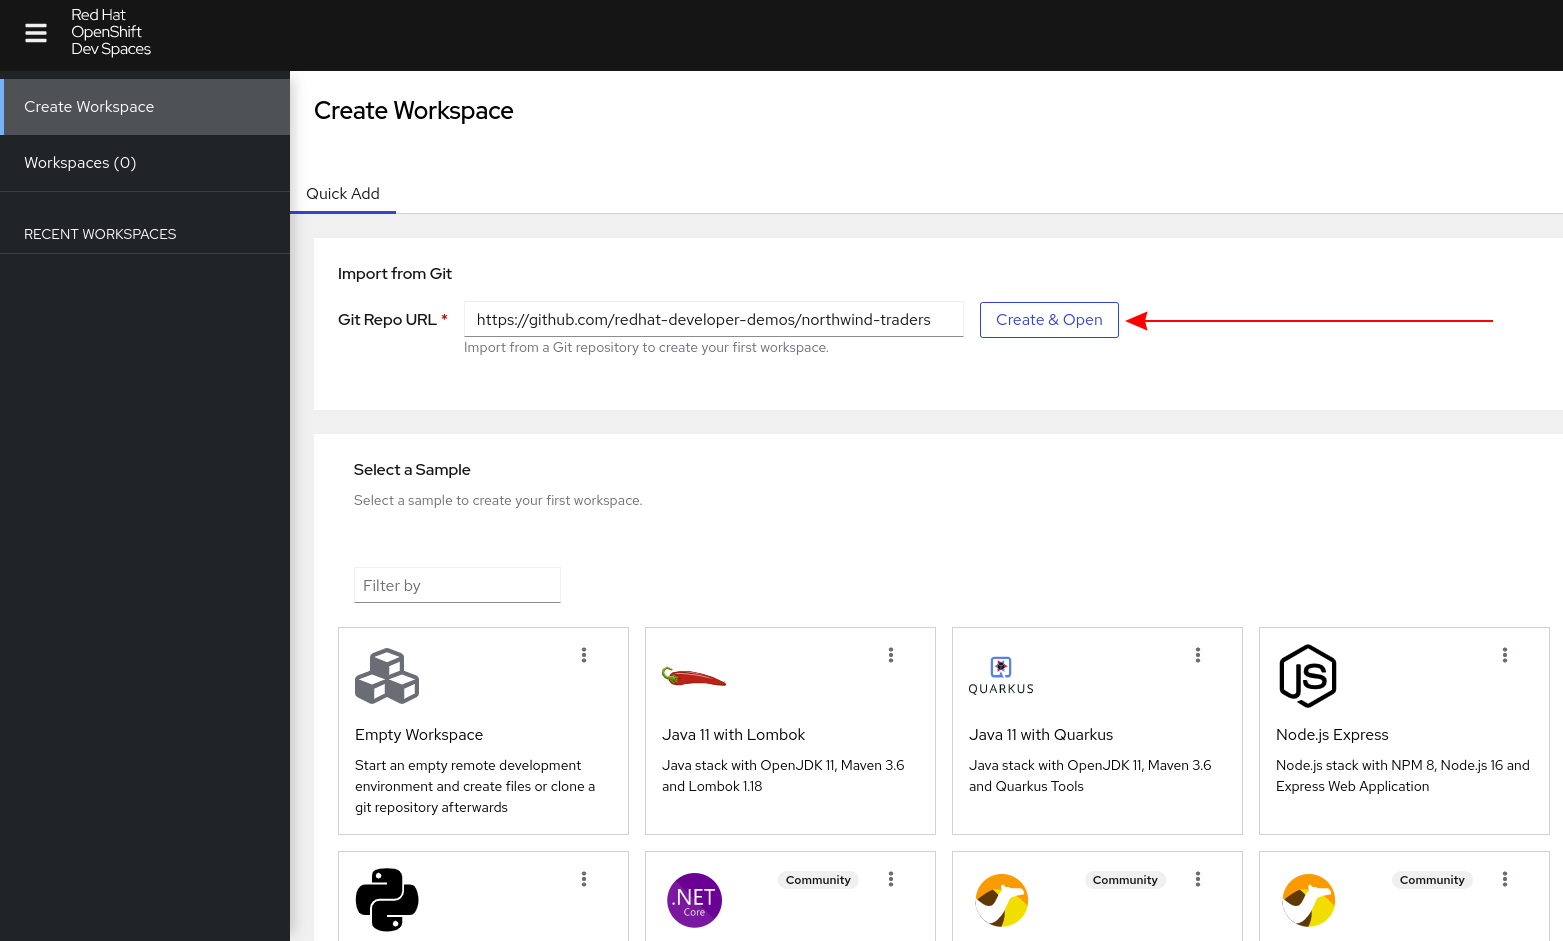
During the workspace startup, you will be asked to authorize the GitHub OAuth app configured for each of the Developer Sandbox clusters:
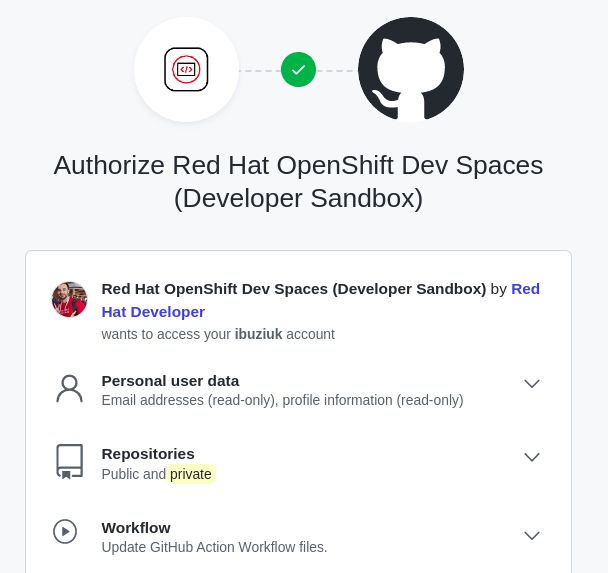
This allows users to have full Git access from the workspaces and execute commands like `git push` without any setup. Under the hood, once permissions are granted, the `git-credentials-secret` is created in the user namespace which stores the token used by OpenShift Dev Spaces. You can always revoke the access at any time from the user dashboard or via GitHub settings.
Once the workspace starts you should be able to see our application source code.
The workspace contains the source code and the runtime with all the dependencies for building, running, and debugging the application. This allows you to start coding instantly. Repeatable and fast development environments are a major benefit of OpenShift Dev Spaces. If you try cloning the same repository locally and try to build it, most likely you will get multiple errors due to missing dependencies. For example, to build and deploy the application, it requires Java 17, JBang, and ‘oc’ CLI, which might not be installed on your local machine.
With OpenShift Dev Spaces, the development environment, including the commands for building and deploying the application, is defined in a declarative way using the .devfile.yaml in the root of the repository. Devfile is a CNCF sandbox project which provides an open standard, defining containerized development environments. Learn more about Devfile from the official documentation.
Deploying the application
Now we are ready to deploy the application. To do that in the workspace click the following commands:
Terminal -> Run Task -> devfile -> 2. Deploy.
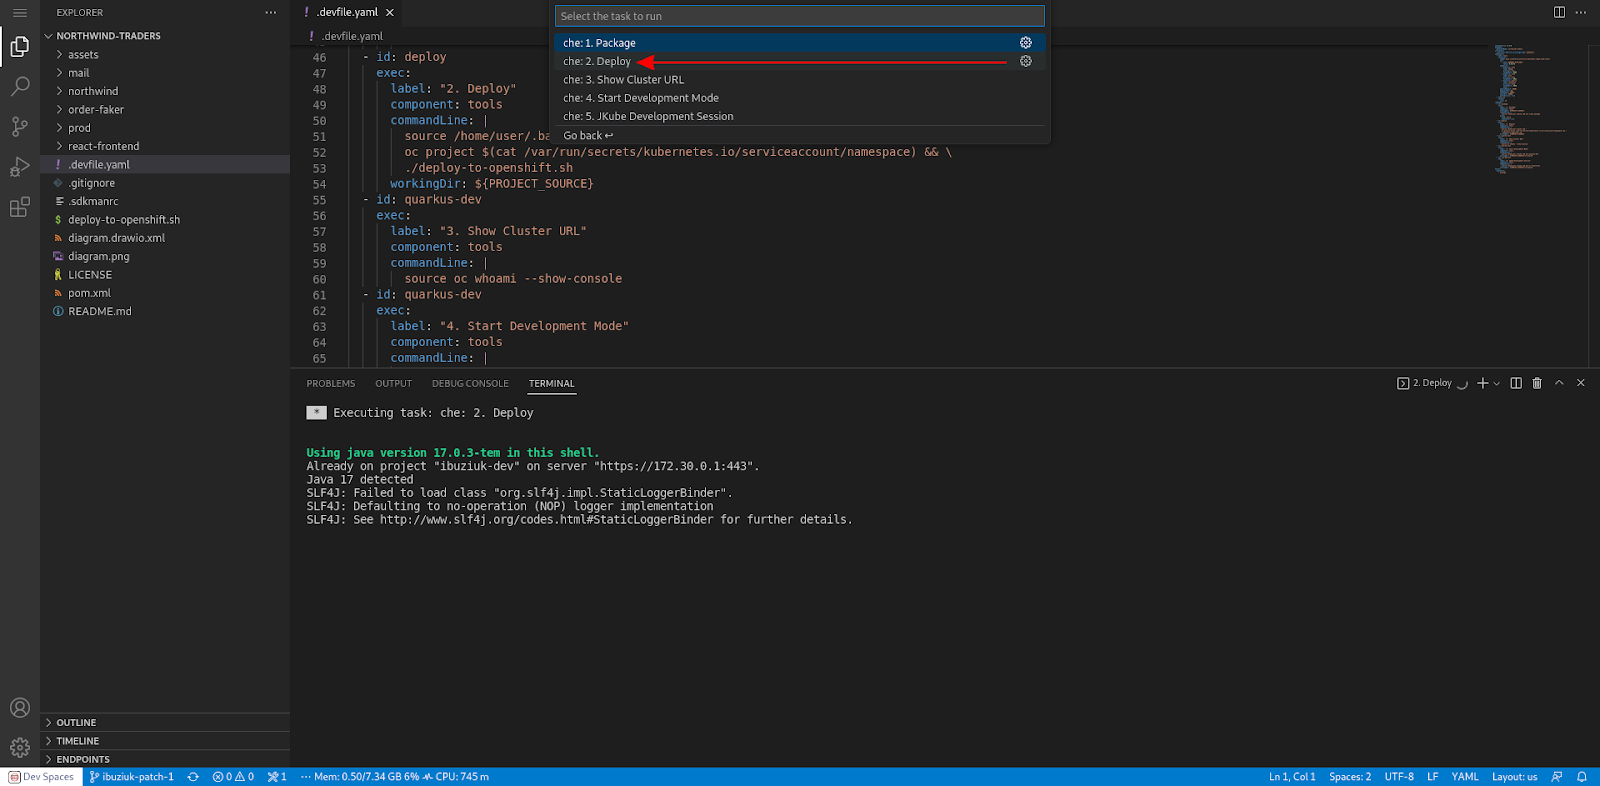
It may take a couple of minutes before the deployment command is complete. After that, you can navigate to the OpenShift cluster and access the application. The easiest way to get the cluster URL is by clicking on the following commands:
Terminal -> Run Task -> devfile -> Show Cluster URL.
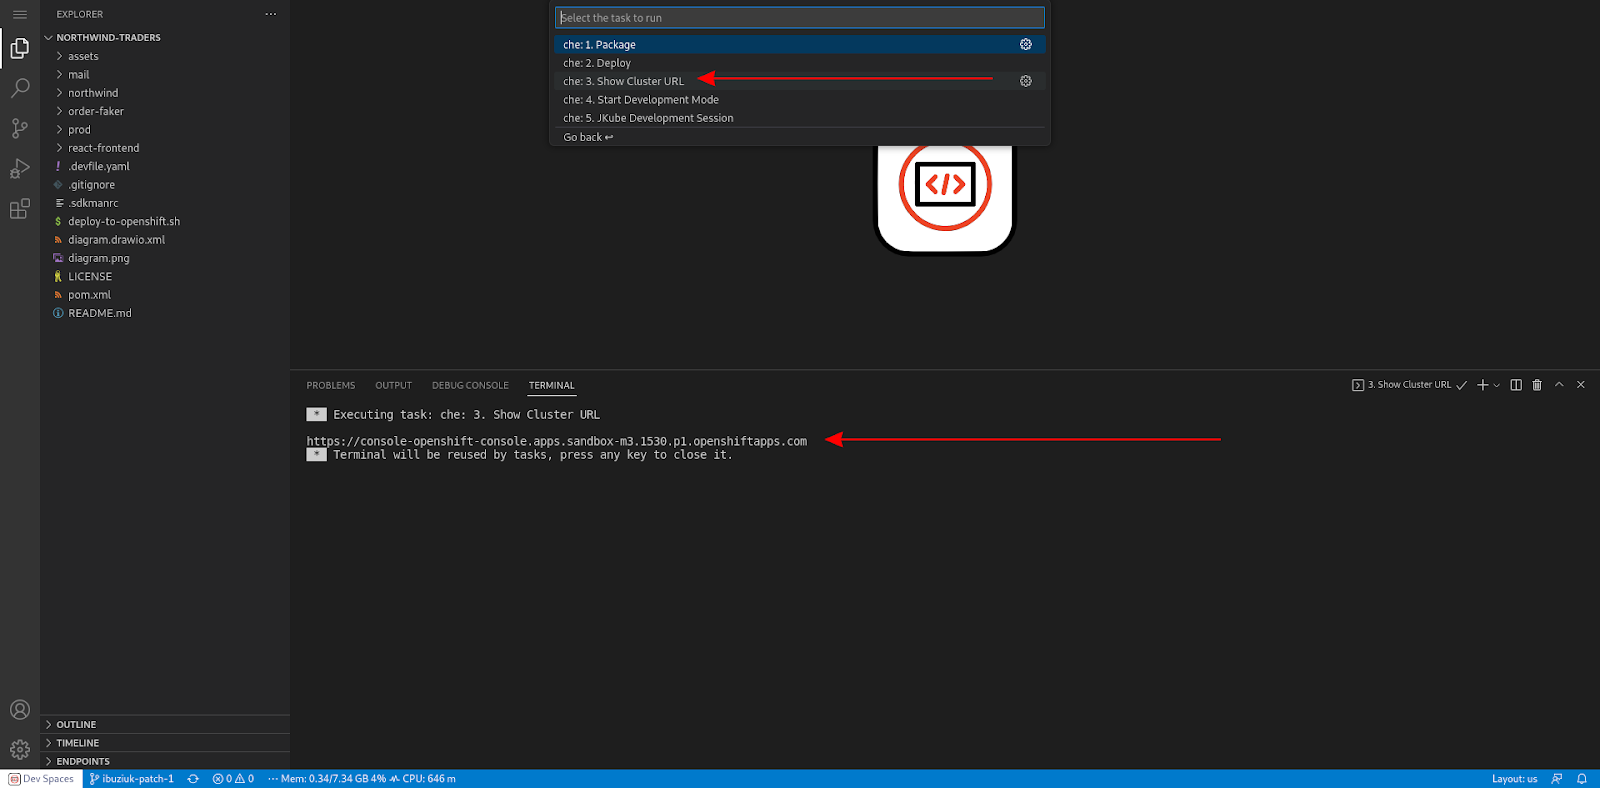
In the terminal, you will see the URL that will take you to the OpenShift cluster. In the Topology view of the Developer perspective, you will see all the microservices of the application.

You can now try the newly deployed application. For more details refer to the dedicated section in the README.MD.
Live implementation on Northwind Quarkus
In this part of the exercise, you will learn how to implement changes in the Northwind Quarkus component while interacting with the rest of the deployed application modules and services.
Eclipse JKube recently introduced a cool new feature called Remote Dev which allows you to code and debug an application while connecting to services only in the cluster. It also allows you to expose your local application to the rest of the services running in the cluster.
The aim of this feature is to avoid replicating a production environment locally, especially in those scenarios where your application depends on tens or hundreds of other services. Reproducing such environments for every single developer might be costly or even impossible if you want to work with real data.
With Eclipse JKube Remote Dev, you can seamlessly replace one of the distributed application components in a staging environment with your application running locally from your IDE. This way, the rest of the services in the cluster will start interacting with your local application instead of the originally deployed one. In addition, your local application will also be able to consume those services, which makes it extremely useful in testing your application with more realistic data sets. Once you’re done, you can stop the Eclipse JKube Remote Dev session, and everything will get back to normal.
Let us now continue by exploring how we can leverage Eclipse JKube Remote Dev in this project.
Starting Quarkus in development mode
We are going to make some changes in the Northwind Quarkus component.
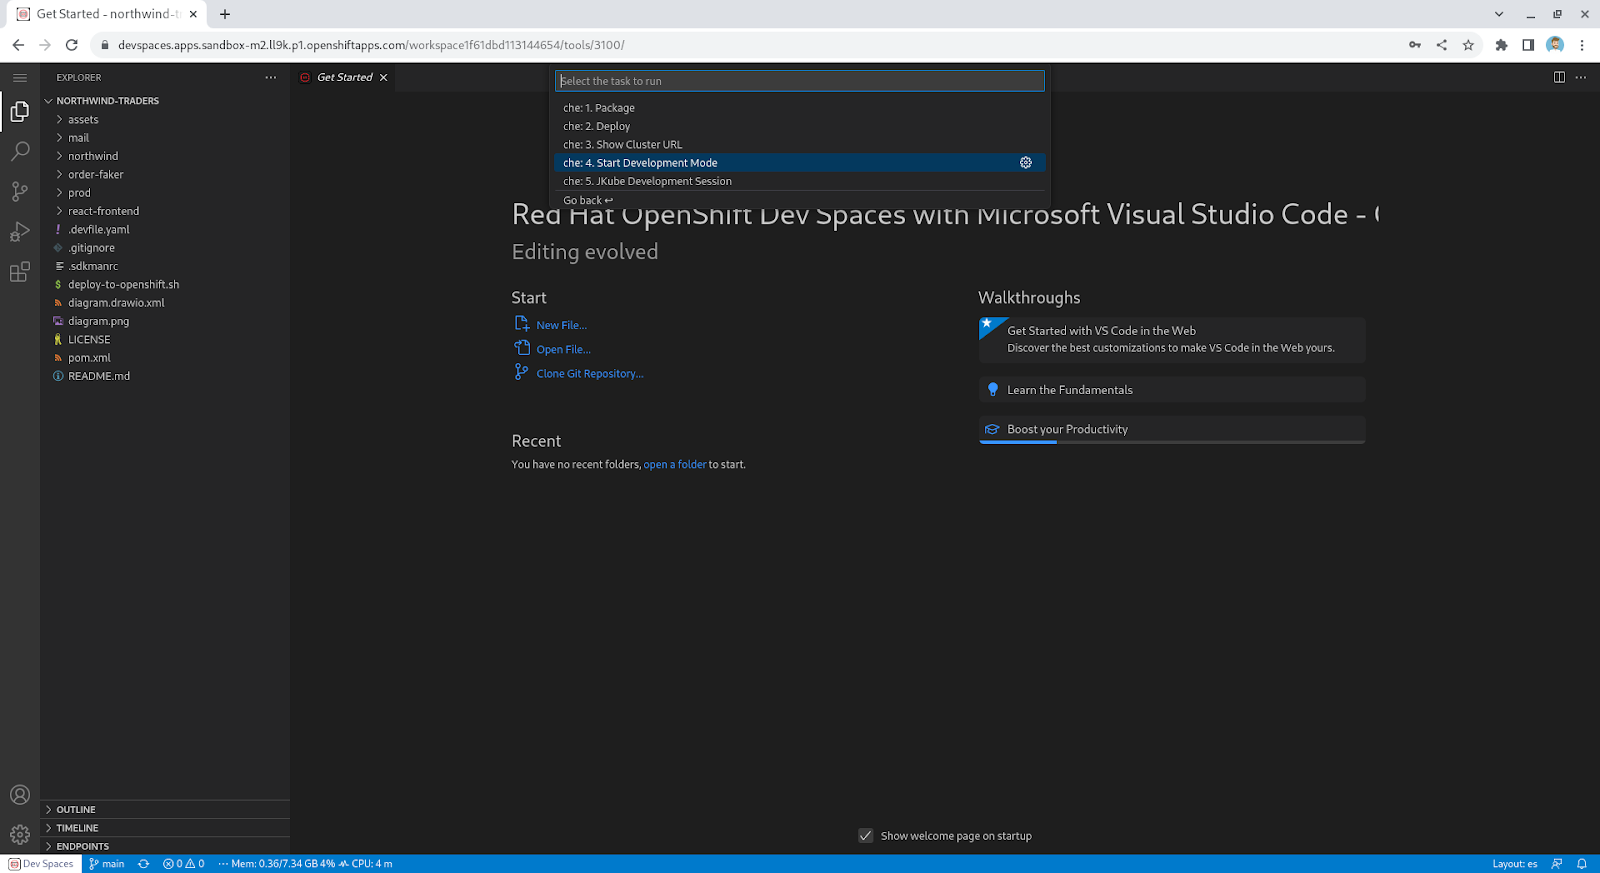
The first step is to start the application in development mode. Click on Terminal -> Run Task -> devfile -> 4. Start Development Mode.
During the command execution, you should ignore the prompt to open the application on port 8080. You should also ignore the prompt for port 5005 because it is used for debugging purposes.
Now that the Quarkus application is ready, we can continue by starting the Eclipse JKube remote development session.
Starting the Eclipse JKube remote development session
Let us now continue by clicking on Terminal -> Run Task -> devfile -> 5. JKube Development Session.
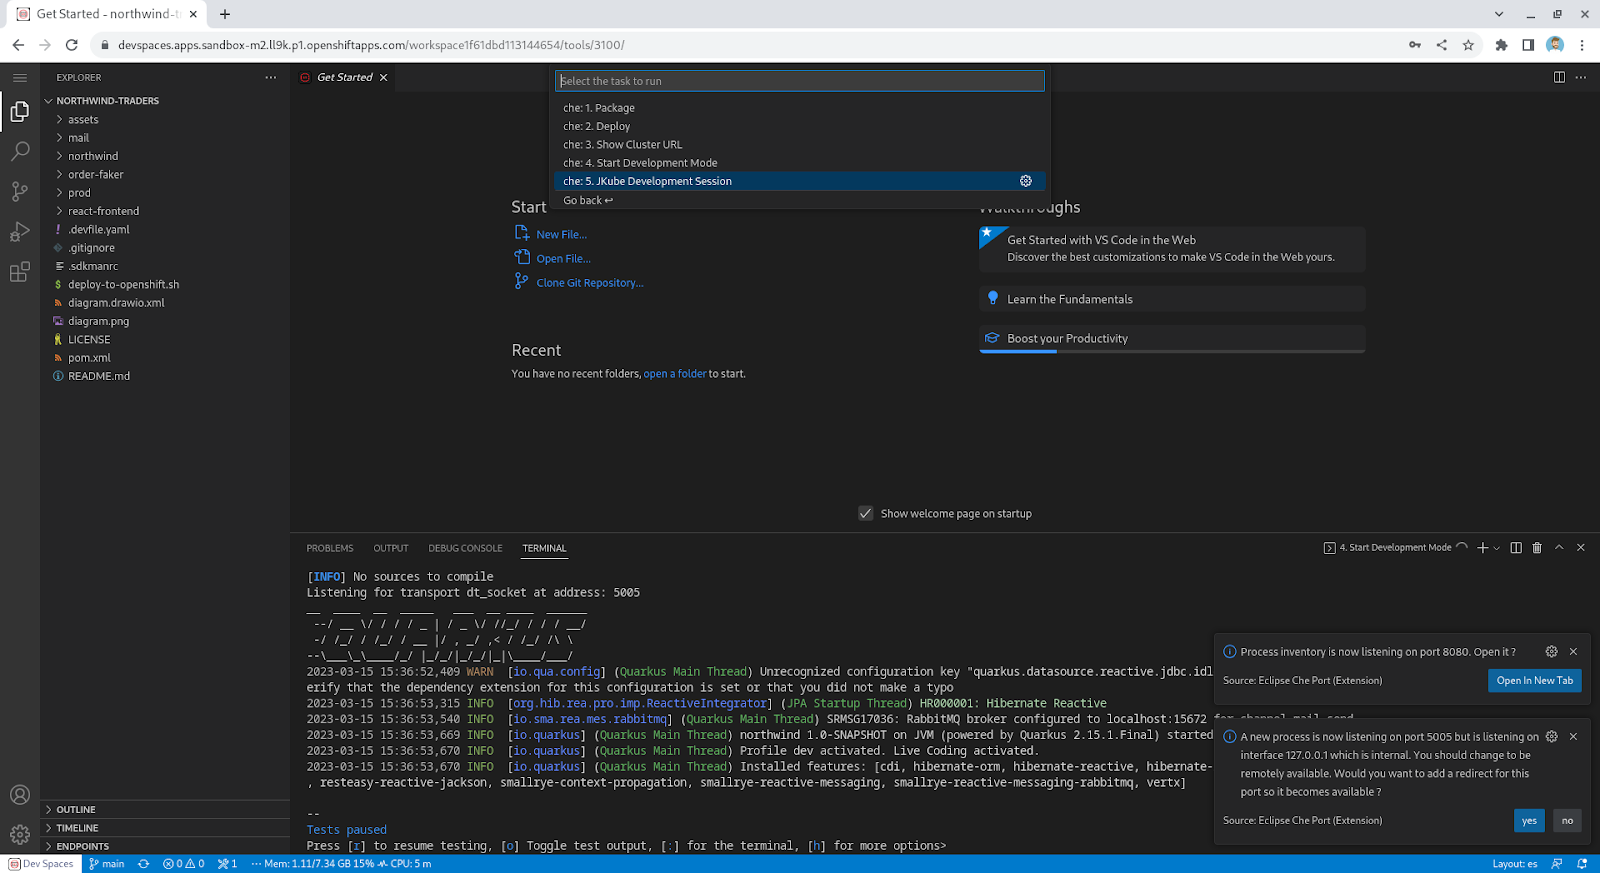
This will start the JKube development session, allowing us to perform live changes on our application while being exposed to the rest of the microservices. Once the session is ready, the terminal should show the following messages:

Now that everything is ready, we can continue by performing modifications to the application.
Live coding the Northwind component
Let’s start by changing the ‘MailService’ Java class to change the subject of the email notification. Open the file on the editor and replace the line where the subject is set to the following:
```
final String subject = "Order " + orderId + " must be shipped as soon as possible";
```
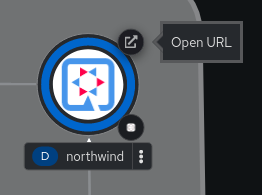
Open the application from your cluster by pressing the Open URL button of the northwind component.
You should now be able to see the application interface.
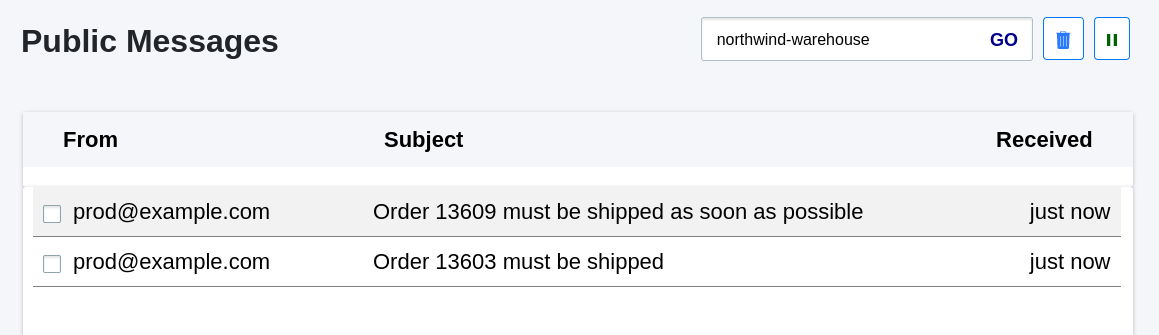
Click on the email icon to send an order to the warehouse. Your local application should now be interacting with the other services in the cluster, and the email subject should contain the changes we made. You can check the email by visiting: https://www.mailinator.com/v4/public/inboxes.jsp?to=northwind-warehouse.
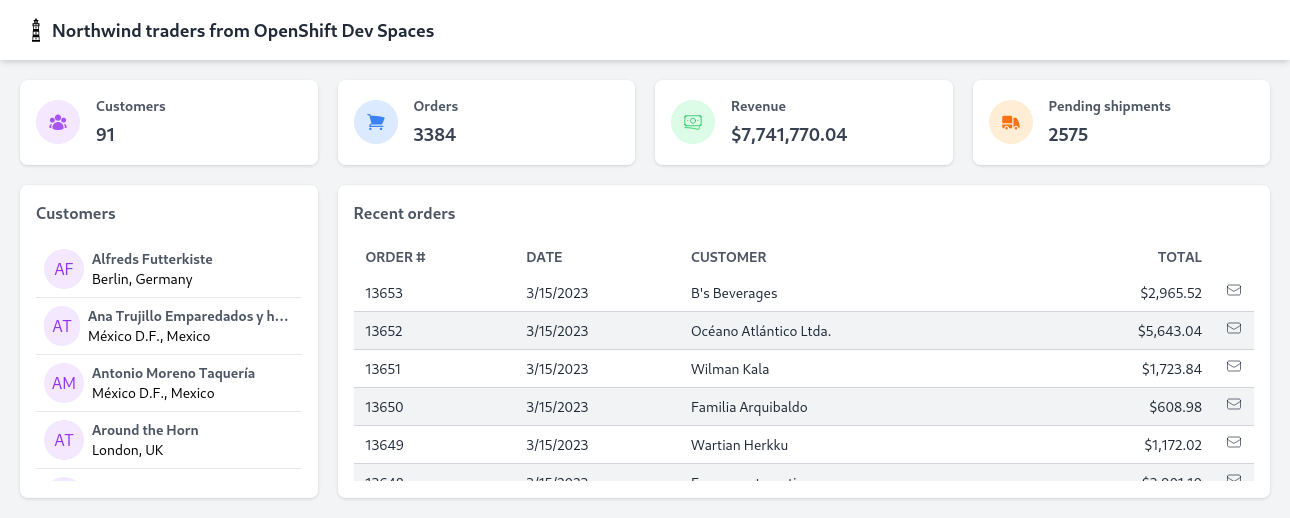
We can also make changes on the dashboard frontend. Let’s open the app.mjs file in the IDE and change the application title to:
```
<h1 className='text-lg font-bold text-gray-800'>
Northwind traders from OpenShift Dev Spaces
</h1>
```
Refresh the dashboard and the changes should be visible.
Stopping the development sessions
Once you’re happy with the changes, stop the Quarkus and Eclipse JKube development sessions, and everything should go back to normal. We can do this by pressing Ctrl+C in the terminals we started.
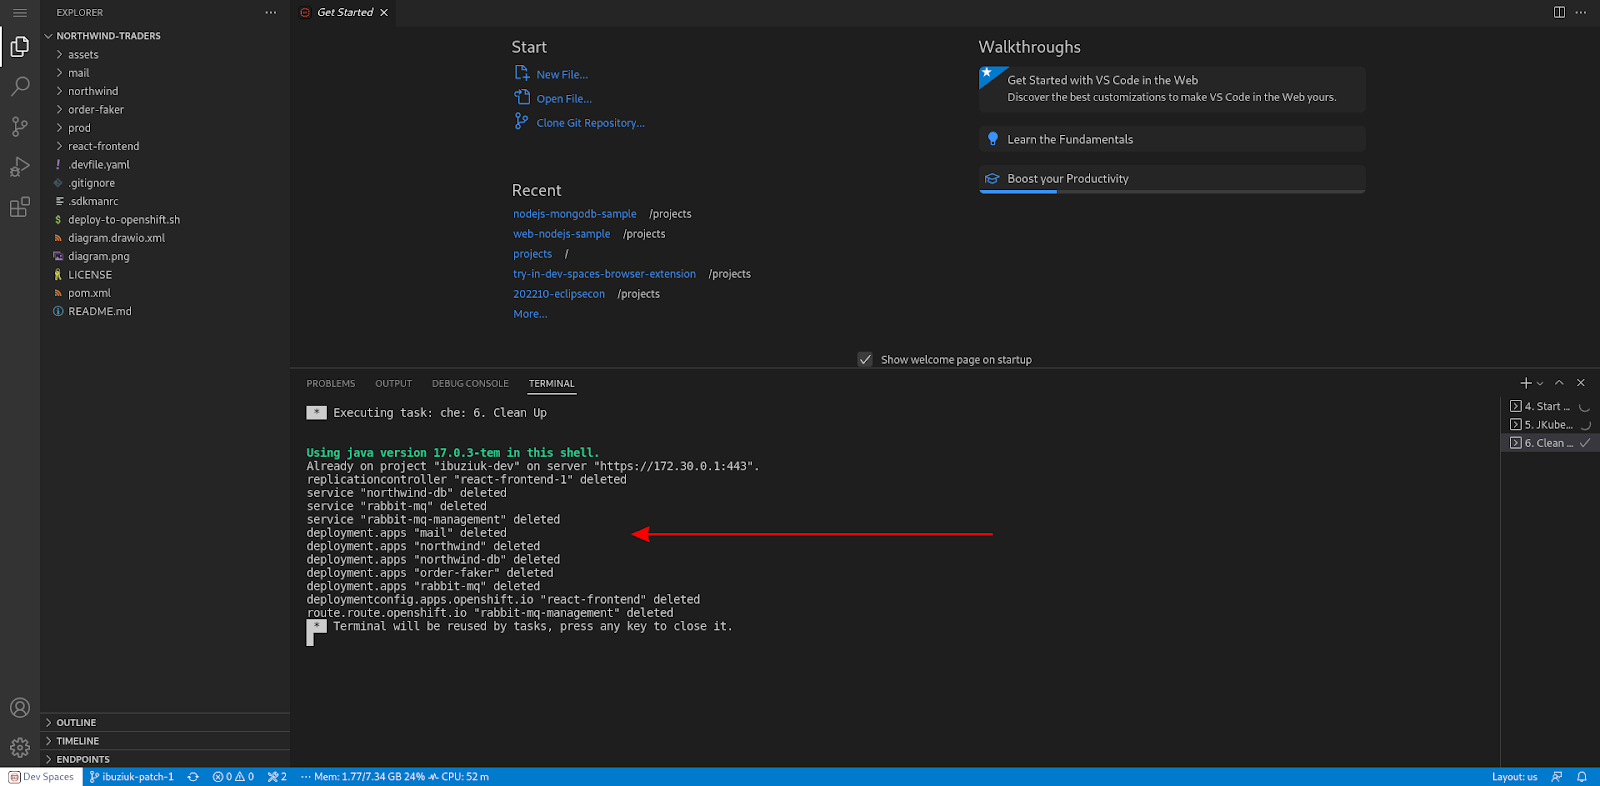
If you want to remove the application from the cluster and clean up the resources in the user namespace after the exercise, execute Terminal -> Run Task -> devfile -> 6. Clean Up.
Summary
Red Hat OpenShift Dev Spaces and JKube provide developers with powerful tools to quickly and easily develop, deploy, and update microservice applications. By leveraging the power of OpenShift Dev Spaces and JKube, developers can streamline the development process and deliver applications with fewer errors and less downtime.
